通过 Deployment 来创建一组 Pod 来提供具有高可用性的服务。虽然每个 Pod 都会分配一个单独的 Pod IP,然而却存在如下两个问题:
service 是一组 pod 的服务抽象,相当于一组 pod 的 LB,负责将请求分发给对应的 pod。service 会为这个 LB 提供一个 IP,一般称为 cluster IP 。使用 Service 对象,通过 selector 进行标签选择,找到对应的 Pod:
[root@k8s-master deployment]# cat svc-myblog.yaml
apiVersion: v1
kind: Service
metadata:
  name: myblog
  namespace: demo
spec:
  ports:
  - port: 80
    protocol: TCP
    targetPort: 8002
  selector:
    app: myblog
  type: ClusterIP
别名
[root@k8s-master deployment]# alias kd='kubectl -n demo'
创建服务
[root@k8s-master deployment]# kubectl create -f svc-myblog.yaml
service/myblog created
[root@k8s-master deployment]# kubectl -n demo  get po --show-labels
NAME                     READY   STATUS    RESTARTS   AGE   LABELS
myblog-b66554b87-jg9k8   1/1     Running   0          12m   app=myblog,pod-template-hash=b66554b87
myblog-b66554b87-phv4x   1/1     Running   0          16m   app=myblog,pod-template-hash=b66554b87
mysql-8fcc5595f-trnx9    1/1     Running   0          28h   app=mysql,pod-template-hash=8fcc5595f
[root@k8s-master deployment]# kubectl -n demo get svc
NAME     TYPE        CLUSTER-IP      EXTERNAL-IP   PORT(S)    AGE
myblog   ClusterIP   10.105.22.70    <none>        80/TCP     32s
mysql    ClusterIP   10.100.42.154   <none>        3306/TCP   37s
[root@k8s-master deployment]# kubectl -n demo describe svc myblog
Name:              myblog
Namespace:         demo
Labels:            <none>
Annotations:       <none>
Selector:          app=myblog
Type:              ClusterIP
IP:                10.105.22.70
Port:              <unset>  80/TCP
TargetPort:        8002/TCP
Endpoints:         10.244.1.25:8002,10.244.2.13:8002
Session Affinity:  None
Events:            <none>
Service 与 Pod 如何关联:
service 对象创建的同时,会创建同名的 endpoints 对象,若服务设置了 readinessProbe, 当 readinessProbe 检测失败时,endpoints 列表中会剔除掉对应的 pod_ip,这样流量就不会分发到健康检测失败的 Pod 中
[root@k8s-master deployment]# kubectl -n demo  get endpoints myblog
NAME     ENDPOINTS                           AGE
myblog   10.244.1.25:8002,10.244.2.13:8002   8m36s
Service Cluster-IP 如何访问:
[root@k8s-master deployment]# kubectl -n demo get svc myblog
NAME     TYPE        CLUSTER-IP     EXTERNAL-IP   PORT(S)   AGE
myblog   ClusterIP   10.105.22.70   <none>        80/TCP    9m22s
[root@k8s-master deployment]# curl 10.105.22.70/blog/index
为 MySQL 创建 svc:
[root@k8s-master deployment]# cat svc-mysql.yaml
apiVersion: v1
kind: Service
metadata:
  name: mysql
  namespace: demo
spec:
  ports:
  - port: 3306
    protocol: TCP
    targetPort: 3306
  selector:
    app: mysql
  type: ClusterIP
访问 MySQL:
[root@k8s-master deployment]# kubectl -n demo get svc mysql
NAME    TYPE        CLUSTER-IP      EXTERNAL-IP   PORT(S)    AGE
mysql   ClusterIP   10.100.42.154   <none>        3306/TCP   11m
curl 10.100.42.154:3306
目前使用 hostNetwork 部署,通过宿主机 ip+port 访问,弊端:
服务均属于 k8s 集群,尽可能使用 k8s 的网络访问,因此可以对目前 myblog 访问 MySQL 的方式做改造:
在 k8s 集群中,组件之间可以通过定义的 Service 名称实现通信。
演示服务发现:
演示思路:在 myblog 的容器中直接通过 service 名称访问服务,观察是否可以访问通
先查看服务:
[root@k8s-master deployment]# kubectl -n demo get svc
NAME     TYPE        CLUSTER-IP      EXTERNAL-IP   PORT(S)    AGE
myblog   ClusterIP   10.105.22.70    <none>        80/TCP     14m
mysql    ClusterIP   10.100.42.154   <none>        3306/TCP   14m
进入 myblog 服务:
[root@k8s-master deployment]# kubectl -n demo get pods
NAME                     READY   STATUS    RESTARTS   AGE
myblog-b66554b87-jg9k8   1/1     Running   0          30m
myblog-b66554b87-phv4x   1/1     Running   0          33m
mysql-8fcc5595f-trnx9    1/1     Running   0          28h
[root@k8s-master deployment]# kubectl -n demo exec -it myblog-b66554b87-jg9k8 bash
[root@myblog-b66554b87-jg9k8 myblog]# curl mysql:3306
5.7.29۾?f(+"ÿÿ!ÿ?9Td	e#|3]Imysql_native_passwordot packets out of order[root@myblog-b66554b87-jg9k8 myblog]#
[root@myblog-b66554b87-jg9k8 myblog]# curl myblog/blog/index/
<!DOCTYPE html>
<html lang="en">
<head>
    <meta charset="UTF-8">
    <title>首页</title>
</head>
<body>
<h3>我的博客列表:</h3>


    </br>
    </br>
    <a href=" /blog/article/edit/0 ">写博客</a>

</body>
</html>
虽然 podip 和 Clusterip 都不固定,但是 service name 是固定的,而且具有完全的跨集群可移植性,因此组件之间调用的同时,完全可以通过 service name 去通信,这样避免了大量的 ip 维护成本,使得服务的 YAML 模板更加简单。因此可以对 MySQL 和 myblog 的部署进行优化改造:
修改 deploy-mysql.yaml:
spec:
      hostNetwork: true	# 去掉此行
      volumes:
      - name: mysql-data
        hostPath:
          path: /opt/mysql/data
修改 configmap.yaml
apiVersion: v1
kind: ConfigMap
metadata:
  name: myblog
  namespace: demo
data:
  MYSQL_HOST: "mysql"	# 此处替换为mysql
  MYSQL_PORT: "3306"
应用修改:
[root@k8s-master deployment]# kubectl apply -f deploy-mysql.yaml
Warning: kubectl apply should be used on resource created by either kubectl create --save-config or kubectl apply
deployment.apps/mysql configured
[root@k8s-master deployment]# kubectl apply -f configmap.yaml
Warning: kubectl apply should be used on resource created by either kubectl create --save-config or kubectl apply
configmap/myblog configured
[root@k8s-master deployment]# kubectl -n demo delete pod mysql-8fcc5595f-trnx9   #重建应用
pod "mysql-8fcc5595f-trnx9" deleted
CoreDNS 是一个 Go 语言实现的链式插件 DNS服务端,是 CNCF 成员,是一个高性能、易扩展的 DNS服务端。
[root@k8s-master deployment]# kubectl -n kube-system get po -o wide|grep dns
coredns-67c766df46-k7ccm             1/1     Running   0          8d    10.244.1.2       k8s-slave1   <none>           <none>
coredns-67c766df46-kr6kh             1/1     Running   0          8d    10.244.1.3       k8s-slave1   <none>           <none>
查看 myblog 的 pod 解析配置
[root@k8s-master deployment]# kubectl -n demo get pod
NAME                     READY   STATUS    RESTARTS   AGE
myblog-b66554b87-jg9k8   1/1     Running   0          3h22m
myblog-b66554b87-phv4x   1/1     Running   0          3h25m
mysql-8fcc5595f-vvrqs    1/1     Running   0          166m
[root@k8s-master deployment]# kubectl -n demo exec -it myblog-b66554b87-phv4x  bash
[root@myblog-b66554b87-phv4x myblog]# cat /etc/resolv.conf
nameserver 10.96.0.10
search demo.svc.cluster.local svc.cluster.local cluster.local
options ndots:5
10.96.0.10 从哪来
[root@k8s-master deployment]# kubectl -n kube-system get svc
NAME       TYPE        CLUSTER-IP   EXTERNAL-IP   PORT(S)                  AGE
kube-dns   ClusterIP   10.96.0.10   <none>        53/UDP,53/TCP,9153/TCP   9d
** 启动 pod 的时候,会把 kube-dns 服务的 cluster-ip 地址注入到 pod 的 resolve 解析配置中,同时添加对应的 namespace 的 search 域。 因此跨 namespace 通过 service name 访问的话,需要添加对应的 namespace 名称,
service_name.namespace_name**
[root@k8s-master deployment]# kubectl get svc
NAME         TYPE        CLUSTER-IP   EXTERNAL-IP   PORT(S)   AGE
kubernetes   ClusterIP   10.96.0.1    <none>        443/TCP   9d
cluster-ip 为虚拟地址,只能在 k8s 集群内部进行访问,集群外部如果访问内部服务,实现方式之一为使用 NodePort 方式。NodePort 会默认在 30000-32767 ,不指定的会随机使用其中一个。
[root@k8s-master deployment]# cat svc-myblog-nodeport.yaml
apiVersion: v1
kind: Service
metadata:
  name: myblog-np
  namespace: demo
spec:
  ports:
  - port: 80
    protocol: TCP
    targetPort: 8002
  selector:
    app: myblog
  type: NodePort
查看并访问服务:
[root@k8s-master deployment]# kubectl create -f svc-myblog-nodeport.yaml
service/myblog-np created
[root@k8s-master deployment]# kubectl -n demo get svc
NAME        TYPE        CLUSTER-IP       EXTERNAL-IP   PORT(S)        AGE
myblog      ClusterIP   10.105.22.70     <none>        80/TCP         3h22m
myblog-np   NodePort    10.111.115.111   <none>        80:30505/TCP   13s
mysql       ClusterIP   10.100.42.154    <none>        3306/TCP       3h22m
集群内每个节点的 NodePort 端口都会进行监听
[root@k8s-master deployment]# curl 192.168.51.210:30505/blog/index/
<!DOCTYPE html>
<html lang="en">
<head>
    <meta charset="UTF-8">
    <title>首页</title>
</head>
<body>
<h3>我的博客列表:</h3>


    </br>
    </br>
    <a href=" /blog/article/edit/0 ">写博客</a>

</body>
</html>[root@k8s-master deployment]# curl 192.168.51.211:30505/blog/index/
<!DOCTYPE html>
<html lang="en">
<head>
    <meta charset="UTF-8">
    <title>首页</title>
</head>
<body>
<h3>我的博客列表:</h3>


    </br>
    </br>
    <a href=" /blog/article/edit/0 ">写博客</a>

</body>
</html>
运行在每个节点上,监听 API Server 中服务对象的变化,再通过创建流量路由规则来实现网络的转发。参照
有三种模式:
IPtables 模式示意图:

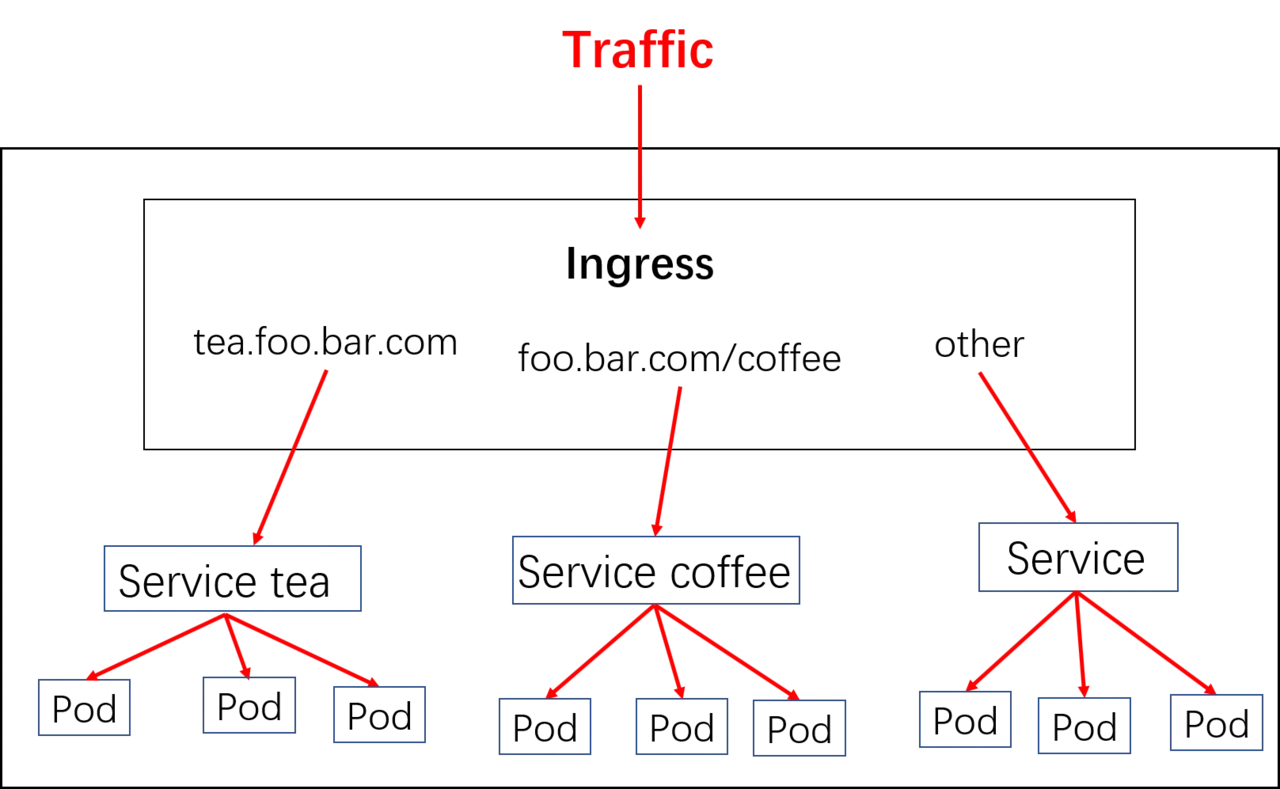
对于 Kubernetes 的 Service,无论是 Cluster-Ip 和 NodePort 均是四层的负载,集群内的服务如何实现七层的负载均衡,这就需要借助于 Ingress,Ingress 控制器的实现方式有很多,比如 nginx, Contour, Haproxy, trafik, Istio,我们以 nginx 的实现为例做演示。
Ingress-nginx 是 7 层的负载均衡器 ,负责统一管理外部对 k8s cluster 中 service 的请求。主要包含:
[root@k8s-master deployment]# cat deploy-myblog-taint.yaml
apiVersion: apps/v1
kind: Deployment
metadata:
  name: myblog
  namespace: demo
spec:
  replicas: 1	#指定Pod副本数
  selector:		#指定Pod的选择器
    matchLabels:
      app: myblog
  template:
    metadata:
      labels:	#给Pod打label
        app: myblog
    spec:
      tolerations: #设置容忍性
      - key: "smoke"
        operator: "Equal"  #如果操作符为Exists,那么value属性可省略,不指定operator,默认为Equal
        value: "true"
        effect: "NoSchedule"
      - key: "drunk"
        operator: "Equal"  #如果操作符为Exists,那么value属性可省略,不指定operator,默认为Equal
        value: "true"
        effect: "NoSchedule"
      containers:
      - name: myblog
        image: 192.168.51.209:5000/myblog
        imagePullPolicy: IfNotPresent
        env:
        - name: MYSQL_HOST
          valueFrom:
            configMapKeyRef:
              name: myblog
              key: MYSQL_HOST
        - name: MYSQL_PORT
          valueFrom:
            configMapKeyRef:
              name: myblog
              key: MYSQL_PORT
        - name: MYSQL_USER
          valueFrom:
            secretKeyRef:
              name: myblog
              key: MYSQL_USER
        - name: MYSQL_PASSWD
          valueFrom:
            secretKeyRef:
              name: myblog
              key: MYSQL_PASSWD
        ports:
        - containerPort: 8002
        resources:
          requests:
            memory: 100Mi
            cpu: 50m
          limits:
            memory: 500Mi
            cpu: 100m
        livenessProbe:
          httpGet:
            path: /blog/index/
            port: 8002
            scheme: HTTP
          initialDelaySeconds: 10  # 容器启动后第一次执行探测是需要等待多少秒
          periodSeconds: 15 	# 执行探测的频率
          timeoutSeconds: 2		# 探测超时时间
        readinessProbe:
          httpGet:
            path: /blog/index/
            port: 8002
            scheme: HTTP
          initialDelaySeconds: 10
          timeoutSeconds: 2
          periodSeconds: 15
执行变更配置 kubectl apply -f deploy-myblog-taint.yaml
点击查看官方文档
[root@k8s-master ingress]# wget https://raw.githubusercontent.com/kubernetes/ingress-nginx/nginx-0.30.0/deploy/static/mandatory.yaml
[root@k8s-master ingress]# ll
total 8
-rw-r--r--. 1 root root 6731 Apr 24 08:09 mandatory.yaml
修改部署节点:
[root@k8s-master ingress]#  grep -n5 nodeSelector mandatory.yaml
212-    spec:
213-      hostNetwork: true #添加为host模式
214-      # wait up to five minutes for the drain of connections
215-      terminationGracePeriodSeconds: 300
216-      serviceAccountName: nginx-ingress-serviceaccount
217:      nodeSelector:
218-        ingress: "true"   #替换此处,来决定将ingress部署在哪些机器
219-      containers:
220-        - name: nginx-ingress-controller
221-          image: quay.io/kubernetes-ingress-controller/nginx-ingress-controller:0.30.0
222-          args:
使用示例:
[root@k8s-master deployment]# cat ingress.yaml
apiVersion: extensions/v1beta1
kind: Ingress
metadata:
  name: myblog
  namespace: demo
spec:
  rules:
  - host: myblog.devops.cn
    http:
      paths:
      - path: /
        backend:
          serviceName: myblog
          servicePort: 80
kubectl  label node k8s-slave1 ingress=true
kubectl get nodes --show-labels
kubectl create -f mandatory.yaml
kubectl create -f ingress.yaml
查看ingress-nginx 运行情况
[root@k8s-master ~]# kubectl -n ingress-nginx get pod -o wide
NAME                                       READY   STATUS    RESTARTS   AGE   IP               NODE         NOMINATED NODE   READINESS GATES
nginx-ingress-controller-766b7d9f4-4pvmj   1/1     Running   0          16h   192.168.51.210   k8s-slave1   <none>           <none>
ingress-nginx 需要用到的镜像:
docker pull bitnami/nginx-ingress-controller:0.30.0
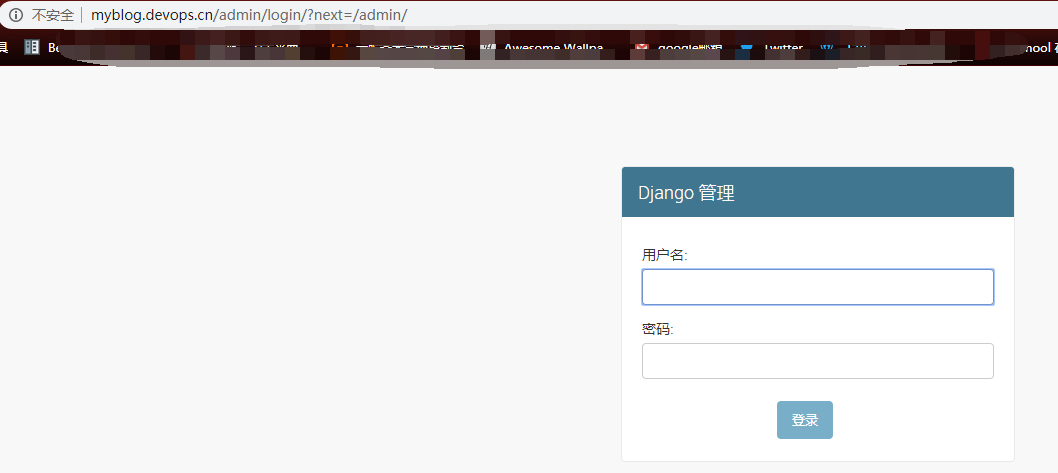
域名解析服务,将 myblog.devops.cn 解析到ingress 的地址上。ingress 是支持多副本的,高可用的情况下,生产的配置是使用 lb 服务(内网 F5 设备,公网 elb、slb、clb,解析到各ingress 的机器,如何域名指向 lb 地址)
本机,添加如下 hosts 记录来演示效果。
192.168.51.210 myblog.devops.cn
访问:http://myblog.devops.cn/blog/index/
[root@k8s-master ~]# openssl req -x509 -nodes -days 2920 -newkey rsa:2048 -keyout tls.key -out tls.crt -subj "/CN=*.devops.cn/O=ingress-nginx"
Generating a 2048 bit RSA private key
..............................+++
..........+++
writing new private key to 'tls.key'
-----
证书信息保存到 secret 对象中,ingress-nginx 会读取 secret 对象解析出证书加载到 nginx 配置中
[root@k8s-master ~]# kubectl -n demo create secret tls https-secret --key tls.key --cert tls.crt
secret/https-secret created
修改ingress 的 YAML 文件
[root@k8s-master deployment]# cat ingress-tls.yaml
apiVersion: extensions/v1beta1
kind: Ingress
metadata:
  name: myblog-tls
  namespace: demo
spec:
  rules:
  - host: myblog.devops.cn
    http:
      paths:
      - path: /
        backend:
          serviceName: myblog
          servicePort: 80
  tls:
  - hosts:
    - myblog.devops.cn
    secretName: https-secret
 邯城往事
邯城往事